Pages

Jumat, 24 Juni 2011

Cara Membuat Pop Art Image

Buka gambar / foto atau Image yang akan dibuat pop art..

Double click layer background dan beri nama..

Buat layer baru, pindahkan ke paling bawah.. ini nanti fungsinya sebagai background.

Sekarang gukanan PenTool untuk menyeleksi objek yang akan dibuat POPArt.perhatikan settingan nya seperti gambar dibawah.

Kalo udah terseleksi semua.. klik kanan di area gambar pilih Make selection.

Gambar sekarang dalam keadaan terseleksi.. Karena kita mau menghilangkan background nya.. kita harus menyeleksi object di belakang gambar.. Klik Select > inverse , Lalu ketan tekan delete

hasil remove background :

Dulikat layer gambar atau layer object dengan menekan CTRL + J, otomatis akan terbentuk layer baru dengan nama Object copy.
Buat duplikat nya menjadi hitam putih.. tekan CTRL + SHIFT + U untuk desaturate ( membuat hitam putih ) atau klik Image > Adjustment > Desaturate.

Klik kanan layer object copy > Duplicate layer

karena kita pilih NEW maka akan terbentuk dokumen baru … ini nanti kunci untuk membuat popart nya..

di dokumen baru ..
klik Image > adjustment > shadow/highlight

*Shadow highlight ini fungsinya nanti untuk memberikan efek detail pada warna-warna yang gelap.. misal rambut..
Klik Image > Adjustment > Threshold

Geser-geser slidernya supaya dapet gambar yang bagus dengan detail yang bagus juga..
Klik Filter > Blur > Gaussian Blur

Klik Image > Mode > Grayscale

Klik Image > mode > Bitmap
Klik Flatten Layer

Halftone screen nya diset seperti dibawah :

bagus kan hasilnya..
Sekarang kita musti membuat Mode image menjadi RGB …
Klik Image > mode > Grayscale

Klik Image > Mode > RGB

Kalo udah jadi RGB sekarang kita bisa export ke dokumen yang sedang kita garap.. caranya ?
Klik kanan layer background > Duplicate layer , Dokumen nya pilih file dokumen yang sedang kita garap..

Keliatan background putihnya.. Trim bagian background putih nya..cara nge TRIM nya..
gerakan kursor mouse ke antara layer background dan layer object copy sambil tekan tombol ALT.
kalo udah keliatan ada 2 lingkaran putih dan hitam..klik .. itu namanya nge TRIm..  :D

kalo bener ngerjain nya background putihnya akan hilang..
Sekarang tinggal proses pewarnaan aja ..
Mewarnai cuman menggunakan Brush tool aja kok.. jadi gak ribet..
Buat layer baru di paling atas
Layer mode nya pilih MULTIPLY..
warna pake warna kulit sesuai kode di gambar
Warnai daerah muka dan badan, kalo ada tangan, warnain juga.

dengan cara yang sama , warnain bibir nya, jangan lupa buat layer baru yah

Sekarang warnain Highlight Rambut

Terakhir warnain baju nya

Sekarang warnain background nya… pilih layer paling bawah…
warnai pake Paint bucket TOOL , warna terserah aja ..sesuka hatimu lah hehehehe…

Dan hasilnya setelah di CROP :


Rabu, 22 Juni 2011

Graffiti with Photoshop

Step 1
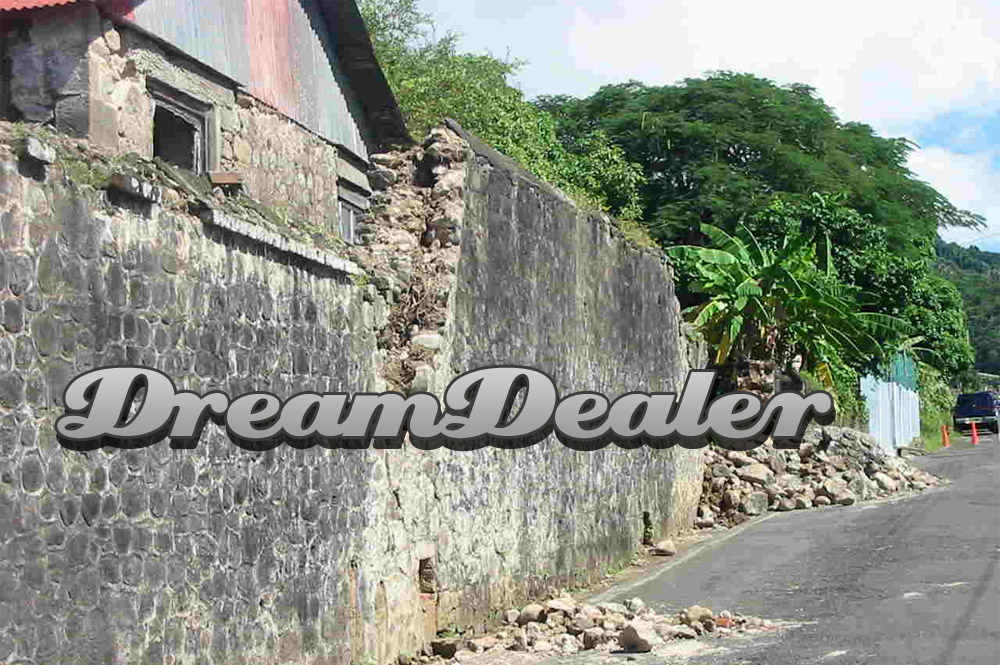
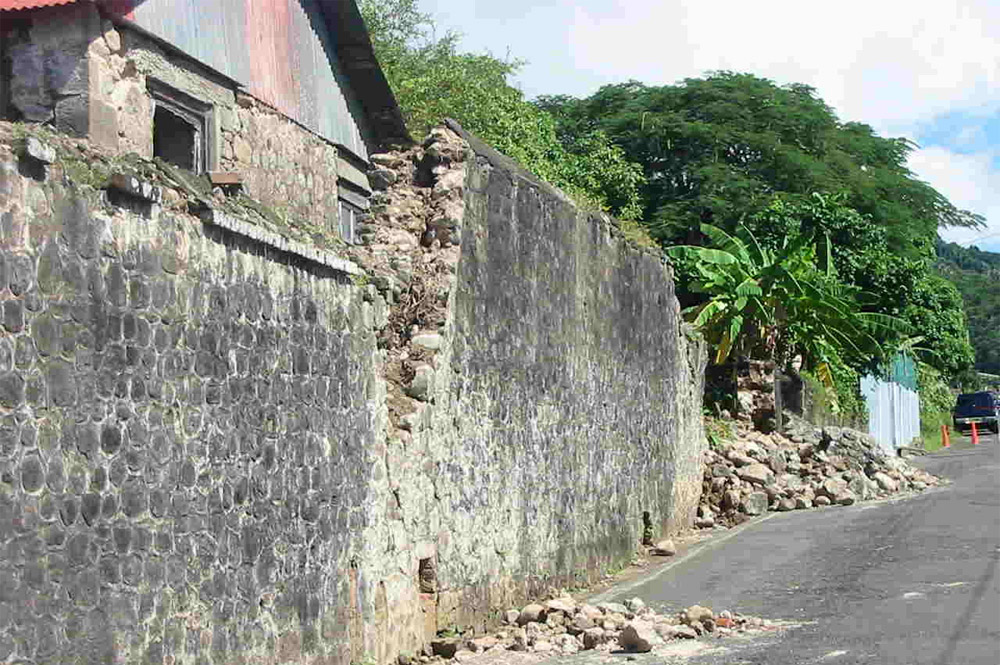
Find yourself a nice photo of a wall to put your logo on (i found this image on the internet with Google Images). Every image is suitable if there is a suitable structure (no smooth walls!).

http://img.dreamdealer.nl/dd/graffiti/stap1.jpg

Step 2
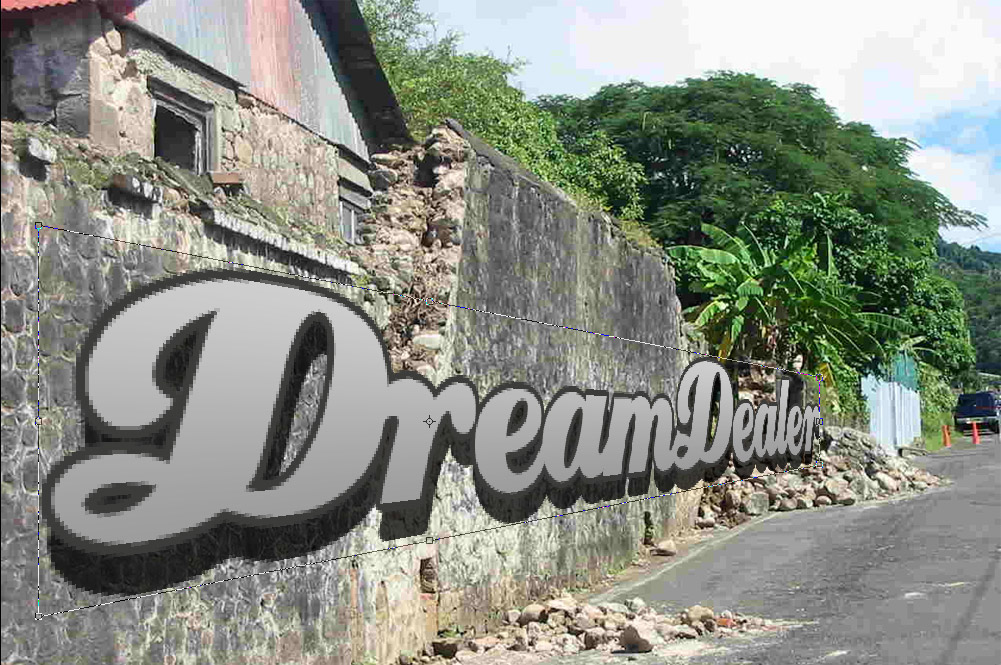
Place the logo you want to use in a new layer. The logo has to be a pixel-based image (no fonts, paths and shapes) because in the next step we will apply a "perspective transfer" wich requires the layer to be pixel-based.

http://img.dreamdealer.nl/dd/graffiti/stap2.jpg

Step 3
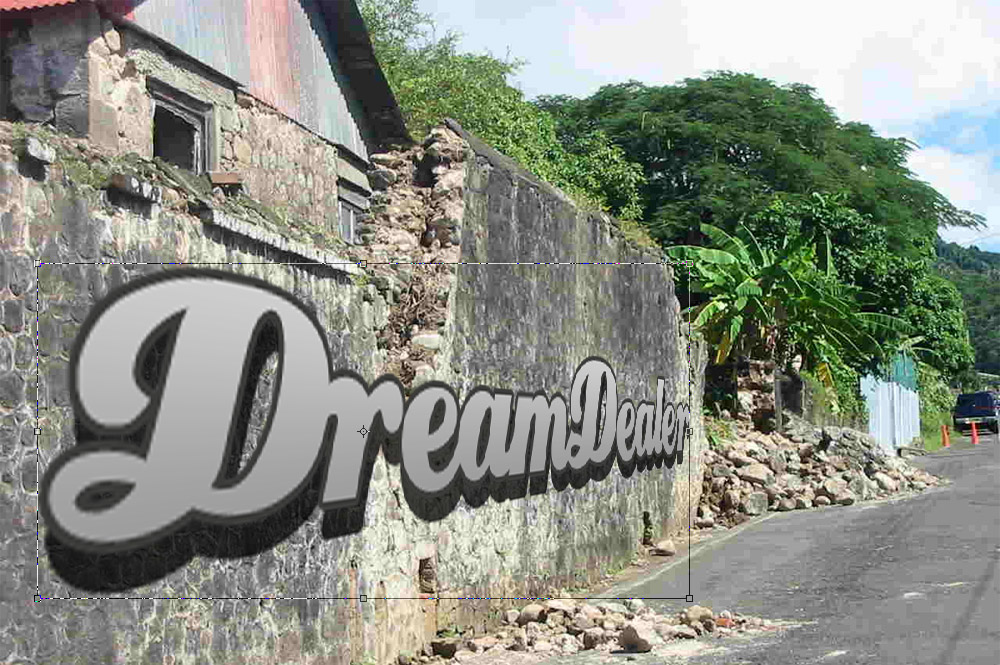
Select "perspective transform" in the edit-menu en change the aspects of the logo that it fits the perspective of the wall. When you mak a "perspective transform" the selection you're transforming gets a bounbing box. You can use the lines of this bounding box to align the logo with the wall.

http://img.dreamdealer.nl/dd/graffiti/stap3.jpg

Step 4
The logo was just a bit to wide, but thats no problem. You can adjust this with the normal transform tool (CTRL+T). Make it a bit smaller so it will fit nicely in the wall. If the perspective of the logo doesn't look realistic, redo the previous steps, because the realism of this is the most important.

http://img.dreamdealer.nl/dd/graffiti/stap4.jpg

Step 5
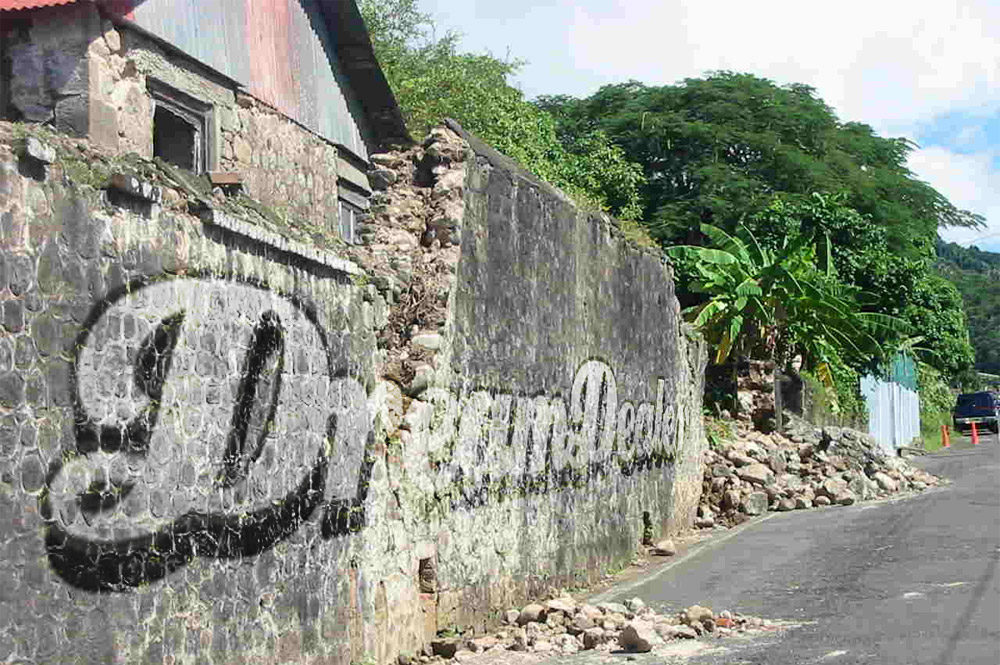
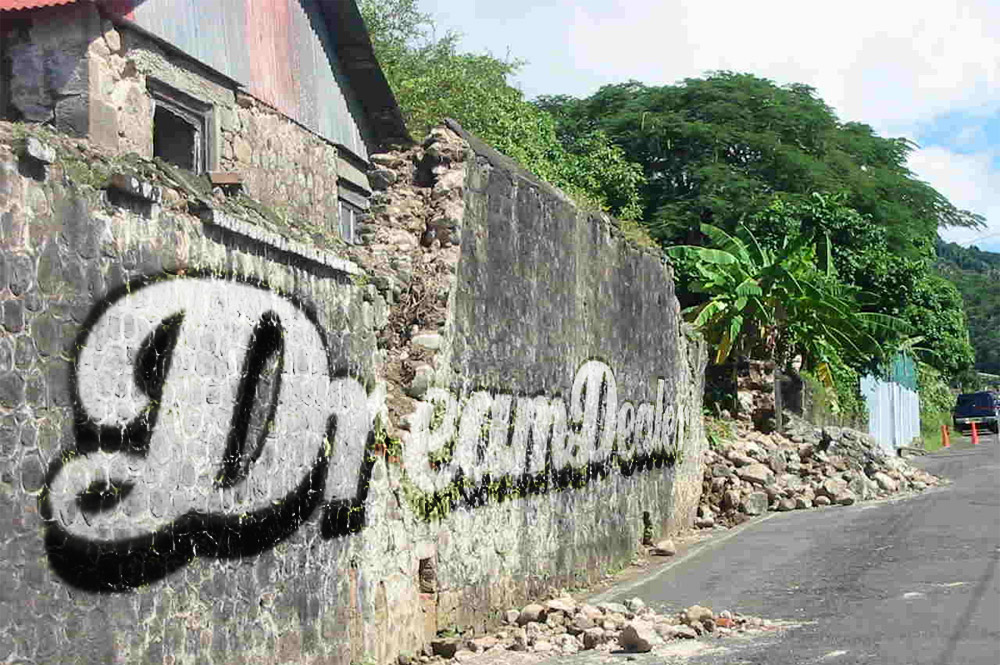
After this, put the blending mode of the logo layer to "overlay":


The result:
http://img.dreamdealer.nl/dd/graffiti/stap6.jpg

Step 6
The logo still has sharp edges and looks more like a sticker than a graffiti drawing. To make this a bit more realistic we are going to blur the edges a bit. To blur only the edges, but not the logo, you'll have to make a copy of the layer and place it under te original logo.


Step 7
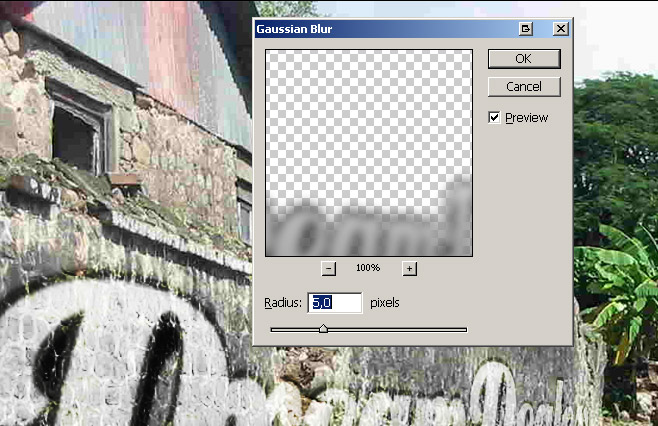
The, blur the copied layer with a "Gaussian Blur" with a value of 5,0 pixels. The gaussian blur is found in the filter-menu.
http://img.dreamdealer.nl/dd/graffiti/stap8.jpg

Step 8

At last, to improve the realism, use the eraser tool to erase the logo where the wall is worn down.

http://img.dreamdealer.nl/dd/graffiti/stap9.jpg

Verfijnen
If you like the vague version of step 5 more, but with the blurred edges, you can select the blurred layer and click (while holding CTRL) on the thumbnail of the original logo layer. This way you'll select the outlines of the original layer. If you've done this, press DELETE to delete the selected part from the blurred layer.

To make it all even more realistic, you can place another graffiti (a more worn down one) on the wall of erase more from the logo to make it look more worn down.
Download AVG Antivirus Free Edition 2011 (Offline Installer)
AVG Antivirus merupakan salah satu antivirus gratis yang cukup populer dan diklaim telah digunakan oleh lebih dari 110 juta pengguna di seluruh dunia. Baru-baru ini AVG mengeluarkan update antivirus baru yaitu AVG Antivirus Free Edition 2011.

AVG Anti-Virus Free Edition 2011 memungkinkan Anda untuk:
  • Jelajahi dan telusuri dengan penuh keyakinan Perlindungan seketika AVG LinkScanner®
  • Tetap terlindungi di jaringan sosial dengan Perlindungan Jaringan Sosial AVG
  • Nikmati PC yang berjalan lebih cepat Pemindaian Cerdas AVG bekerja selagi Anda tinggalkan dan berjalan dalam mode prioritas rendah saat Anda kembali
  • Tetap terinformasikan dengan informasi ancaman terbaru dari Jaringan Perlindungan Komunitas AVG dan Teknologi Awan Pelindung AVG
Jika Anda tertarik untuk menggunakan AVG Antivirus Free Edition 2011, Anda bisa download melalui link berikut ini:

Icey Styles in Photoshop


In this tutorial, we’re going to create an icey-cold effect using layer styles and that you can apply to different objects. Then we’ll put it on a nice background to give it some kick. You can download the PSD file at the bottom of the tutorial if you’d simply like to copy+paste the layer styles.

Step 1:

We start as always with a background gradient. I’ve used a Radial Gradient with two shades of a nice blue. Blues are good for this effect because they look cold…
Foreground color – #282c54
Background color – #0a0d2e

Step 2:

Now for our background effect, we’re going to add a starburst. This produces a cool retro-looking effect. So go to the shapes palette and look for the shape pictured. It looks weird in the preview, but that is in fact the Starburst icon.

Step 3:

So in a new layer using white, draw out the shape. Note that you need to make it bigger than your stage because it is in fact a wheel and the edges of the wheel look dumb. So make it really large and centered and white.

Step 4:

Now change the opacity to 10% and set it to Overlay. Then grab a big soft brush and erase a bit of the center, this gives the effect that its fading in from nothing.

Step 5:

Finally I’ve written my text. I’ve used the font Kabel Bold, because it has a really fun, blocky feel. Fat fonts like this are great for doing effects on because there’s lots of room to play. I’ve placed the text carefully so that the letters are quite close to each other and the n is bunched up in a nice little space.
Working with text is actually a hallmark of good design and is one of the key ways that designers judge how good another designer is. Although subtle, it’s worth observing how other designers place text on posters, signs, and billboards around you. Look for spacing between letters, lines, sizing, and general placement. You can in fact do a lot just with typography.

Step 6:

Now the main effect in this tutorial is achieved by adding a whole bunch of layer styles. I won’t bore you by detailing each one. Just download the PSDs from the link at the top right and right-click on the layer and select Copy Layer Style. Then you can just paste it around. Make sure the text is white and note that the effect works best on a dark background.
Just to describe the effect that we are trying to achieve, because you want it to look cold, we use white and shades of light blue. Blues, particularly lighter ones, look very chilly, and using a clever bevel we can make it look like the light blues are in fact shadows on these blockey ice letters.
Finally, because we’re doing a kind of comic ice, I’ve used a block shadow. So if you look at the shadow effect you’ll see it doesn’t actually blur out. This makes for a non-realistic comic look, particularly when combined with this sort of font.

Step 7:

And there it is!

Sample PSD

Selasa, 21 Juni 2011

Kumpulan Materi Multimedia


Download Ebook Adobe Premiere

LOGO ADOBE PREMIERE 
Adobe Premiere Pro adalah sebuah program penyunting video. Itu adalah sebagian dari Adobe Creative Suite, walaupun bisa dibeli sendirian. Bahkan kalau dibeli sendirian, itu termasuk Adobe Encore dan Adobe On Location. Walaupun yang dua versi pertama hanya tersedia untuk Windows, versi CS3 tersedia baik untuk Windows maupun Mac OS X. CS3 tersedia dalam Bahasa Inggris, Bahasa Perancis, Bahasa Jerman, Bahasa Jepang, Bahasa Italia, dan Bahasa Spanyol. Versi terbaru adalah Adobe Premiere Pro CS5.

Premiere Pro digunakan oleh BBC dan The Tonight Show. Dan juga sudah digunakan untuk penyuntingan film-film, seperti Dust to Glory, Captain Abu Raed, dan Superman Returns, dan untuk tempat lain seperti Confessions Tour oleh Madonna.
Sumber : Wikipedia

Download Ebook – Tutorial Adobe Premiere

Adobe Photoshop digunakan oleh fotografer digital


GAMBAR BOX ADOBE PGOTOSHOP CS5 
Adobe Photoshop, atau biasa disebut Photoshop, adalah perangkat lunak editor citra buatan Adobe Systems yang dikhususkan untuk pengeditan foto/gambar dan pembuatan efek. Perangkat lunak ini banyak digunakan oleh fotografer digital dan perusahaan iklan sehingga dianggap sebagai pemimpin pasar (market leader) untuk perangkat lunak pengolah gambar, dan, bersama Adobe Acrobat, dianggap sebagai produk terbaik yang pernah diproduksi oleh Adobe Systems. Versi kedelapan aplikasi ini disebut dengan nama Photoshop CS (Creative Suite), versi sembilan disebut Photoshop CS2, versi sepuluh disebut Adobe Photoshop CS3 , dan versi yang kesebelas  disebut Adobe Photoshop CS4. Versi yang terbaru adalah Adobe Photoshop CS5.

Photoshop tersedia untuk Microsoft Windows, Mac OS X, dan Mac OS; versi 9 ke atas juga dapat digunakan oleh sistem operasi lain seperti Linux dengan bantuan perangkat lunak tertentu seperti CrossOver.

Pengembangan Adobe Photoshop

Pada tahun 1987, Thomas Knoll, mahasiswa PhD di Universitas Michigan, mulai menulis sebuah program pada Macintosh Plus-nya untuk menampilkan gambar grayscale pada layar monokrom. Program ini, yang disebut Display, menarik perhatian saudaranya John Knoll, seorang karyawan di Industrial Light & Magic, yang merekomendasikan Thomas agar mengubah programnya menjadi program penyunting gambar penuh. Thomas mengambil enam bulan istirahat dari studi pada tahun 1988 untuk berkolaborasi dengan saudaranya pada program itu, yang telah diubah namanya menjadi ImagePro.Setelah tahun itu, Thomas mengubah nama programnya menjadi Photoshop dan bekerja dalam jangka pendek dengan produsen scanner Barneyscan untuk mendistribusikan salinan dari program tersebut dengan slide scanner; “total sekitar 200 salinan Photoshop telah dikirimkan” dengan cara ini.
Selama waktu itu, John bepergian ke Silicon Valley di California dan memberikan demonstrasi program itu kepada insinyur di Apple Computer Inc. dan Russell Brown, direktur seni di Adobe. Kedua demonstrasi itu berhasil, dan Adobe memutuskan untuk membeli lisensi untuk mendistribusikan pada bulan September 1988. Sementara John bekerja pada plug-in di California, Thomas tetap di Ann Arbor untuk menulis kode program. Photoshop 1.0 dirilis pada 1990 khusus untuk Macintosh.

Fitur Adobe Photoshop

Meskipun pada awalnya Photoshop dirancang untuk menyunting gambar untuk cetakan berbasis-kertas, Photoshop yang ada saat ini juga dapat digunakan untuk memproduksi gambar untuk World Wide Web. Beberapa versi terakhir juga menyertakan aplikasi tambahan, Adobe ImageReady, untuk keperluan tersebut.
Photoshop juga memiliki hubungan erat dengan beberapa perangkat lunak penyunting media, animasi, dan authoring buatan-Adobe lainnya. File format asli Photoshop, .PSD, dapat diekspor ke dan dari Adobe ImageReady. Adobe Illustrator, Adobe Premiere Pro, After Effects dan Adobe Encore DVD untuk membuat DVD profesional, menyediakan penyuntingan gambar non-linear dan layanan special effect seperti background, tekstur, dan lain-lain untuk keperluan televisi, film, dan situs web. Sebagai contoh, Photoshop CS dapat digunakan untuk membuat menu dan tombol (button) DVD.
Photoshop dapat menerima penggunaan beberapa model warna:
Versi terbarunya, yang dirilis pada tahun 2005, adalah versi 9. Program ini dipasarkan dengan nama “Photoshop CS2.” “CS” merefleksikan integrasi produk Photoshop dengan aplikasi “Creative Suite buatan Adobe dan disebut “2″ karena program ini adalah versi rilis ke-2 sejak Adobe mengintegrasikan kedua produknya. Ada beberapa pada tambahan pada Photoshop CS2 seperti multiple layer selecting dan “warp,” versi kurva dari transform tool dan color replacement tool, yang sebelumnya hadir sebagai plug-in 8BF.
Untuk para penggemar fotografi, Adobe menyediakan filter “reduce grain” (mengurangi grain) yang dapat membantu mengoptimalkan foto yang diambil pada kondisi kekurangan cahaya. Untuk “memperjelas” perbedaan produk CS dengan produk-produk Photoshop sebelumnya, Adobe menghilangkan lambang mata Photshop, yang dipresentasikan dalam bentuk yang berbeda-beda sejak versi 3 sampai versi 7. Photshop CS dan CS2 kini menggunakan bulu sebagai ikon dan bentuk identifikasinya.

Format File

Photoshop memiliki kemampuan untuk membaca dan menulis gambar berformat raster dan vektor seperti .png, .gif, .jpeg, dan lain-lain. Photoshop juga memiliki beberapa format file khas:
  • .PSD (Photoshop Document) format yang menyimpan gambar dalam bentuk layer, termasuk teks, mask, opacity, blend mode, channel warna, channel alpha, clipping paths, dan setting duotone. Kepopuleran photoshop membuat format file ini digunakan secara luas, sehingga memaksa programer program penyunting gambar lainnya menambahkan kemampuan untuk membaca format PSD dalam perangkat lunak mereka.
  • .PSB’ adalah versi terbaru dari PSD yang didesain untuk file yang berukuran lebih dari 2 GB
  • .PDD adalah versi lain dari PSD yang hanya dapat mendukung fitur perangkat lunak PhotshopDeluxe.

Dampak terhadap industri

Pengembangan manipulasi gambar digital banyak mempengaruhi industri fotografi. Pengembangan tersebut menciptakan seni pengolah gambar (photo retouching) dan mengubah cara kerja: produk yang biasanya hanya dapat diciptakan oleh fotografer profesional selama berjam-jam atau bahkan berhari-hari, kini dapat diproduksi oleh seniman amatir sekalipun. Manipulasi gambar digital telah menyumbang begitu banyak hal kepada dunia fotografi dengan memungkinkan manipulasi yang awalnya sulit atau bahkan tak mungkin. Photoshop berperan besar dalam perkembangan dunia digital saat ini.
Pada masa revolusi fotografi digital di tahun 90-an, Photoshop menjadi standar di dunia industri. Banyak fotografer yang menggunakan program ini untuk mengoptimalkan hasil akhir foto yang mereka ciptakan.
Dengan kehadiran tablet grafik, terutama dari Wacom, program seperti Adobe Photoshop dan Corel Painter semakin dibutuhkan untuk menciptakan gambar orisinal. Dengan menggunakan pressure sensitive tablet dapat meningkatkan efek paint brush, eraser, atau tool lainnya. Tablet digunakan secara global oleh para ilustrator komik profesional, arsitek, seniman studio, dan lainnya. Bahkan ILM, perusahaan spesial efek yang berperan dalam produksi film Star Wars, menggunakan tablet yang dikombinasikan dengan Photoshop untuk mengoptimalkan hasil-produksinya.

Kebudayaan

Kata Photoshopping muncul sebagai sebuah neologisme, yang berarti “menyunting sebuah gambar”, meskipun pengolahan gambar itu sendiri tidak menggunakan Photoshop sebagai programnya (sama seperti Google yang saat ini dapat digunakan sebagai kata kerja). Adobe discourages use of the term out of fear that it will undermine the company’s trademark. The term photoshop is also used as a noun referring to the altered image.
Photoshopping gambar untuk tujuan humor menjadi populer dikalangan anggota beberapa website seperti Something Awful dan Fark. Kontes Photoshop juga menjadi sebuah tradisi bagi para pengguna software ini.

Alternatif Selain Adobe Photoshop

Ada beberapa perangkat lunak yang dapat digunakan sebagai ganti Photoshop, yang paling terkenal adalah Coler Photo-Paint (sepaket dengan CorelDRAW, Corel Painter, Corel Paint Shop Pro Photo XI dan Ulead PhotoImpact. Perangkat lunak lainnya termasuk Helicon Filter, GIMP, openCanvas, Paint.NET, dan Pixel image editor.
Sumber : Wikipedia , Blog Sahabat
DOWNLOAD GRATIS TUTORIAL ADOBE PHOTOSHOP :

FUNGSI TOOL DAN AREA PADA ADOBE PHOTOSHOP
MEMBUAT BENDERA KUSUT
MEMBUAT BUBLE
MEMBUAT CHROME TEXT EFFECT
MEMBUAT EFFECT CLOUD
MEMBUAT EFFECT MOZAIK
MEMBUAT FOTO TEXT
MEMBUAT GOLD TEXT EFFECT
MEMBUAT SELEKSI DENGAN CHANNEL
MEMBUAT FOTO REALISTIK
MEMPERHALUS TEPIAN SELEKSI
MENGATUR TEPI SELEKSI
MENGHILANGKAN BACKGROUND
MENGUBAH FOTO JADI KARTUN
MENGURUSKAN BADAN
MENYIMPAN SELEKSI
NO SMOKING
SELEKSI DENGAN CHANNEL DAN LAYER MASK
SELEKSI DENGAN MAGIC WAND
SELEKSI GAMBAR DENGAN COLOR RANGE
SELEKSI MEMAKAI MAGNETIC LASSO TOOL